Experiment Development Containers (XDCs)
Overview
Users interact with materialized experiments through experiment development containers (XDC).
Users can create XDCs and attach them to materialized experiments through either the mrg command
line interface (CLI) or the web GUI, and can connect to XDCs from their workstations using either a
JupyterHub web interface or through a standard SSH command line client. Users commonly use XDCs as a
single, centralized point of command and control for experiment automation and orchestration.
This walk through will show the process of creating an XDC, attaching it to a materialization, and connecting to it through a standard SSH configuration.
XDC basics
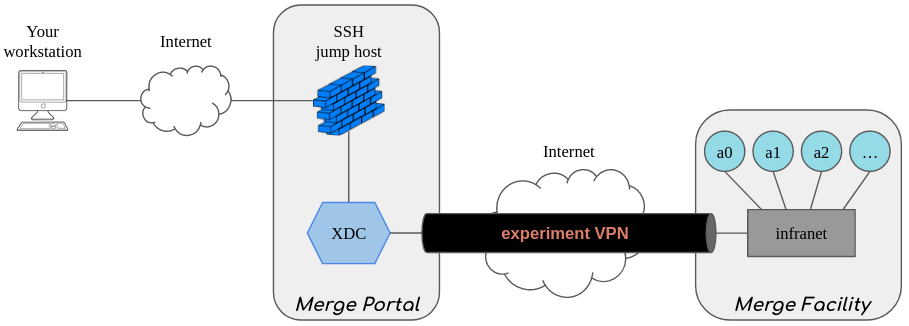
At a high level an XDC provides a typical Linux environment through which the user can connect to and thus control their materialization nodes over a secure network. XDCs run on the Merge portal and act as an intermediary between your workstation and the nodes of an experiment materialization.
The following summarizes the basic characteristics of the Merge XDC:
- Any user can create an XDC either via the web GUI or
mrgCLI. - An XDC can be either shared (the default) or personal.
- A shared XDC is associated with a single project. That project may be a user’s personal project, or it may be a project with multiple additional members.
- Each shared XDC runs in an environment that is accessible to each member of the project. Each project member has access to the XDC, even if they did not create the XDC themselves.
- A personal XDCs has only one user - the one who created it and can be associated with any project the user has the access to.
- Each XDC runs an Ubuntu 20.04 or 22.04 container with standard Ubuntu tools and binaries. Future Merge versions may support user-configurable XDC images.
- XDCs are accessible both online via a Jupyter Hub web interface and via SSH.
- XDC have remote permanent storage mounted so data remains after an XDC is destroyed.
/home/$USER- All home directories of project members/project/<project_name>- A shared project directory that all project members can access. Shared XDCs mount only the project they’re associated with. Personal XDCs mount all the user’s projects.
- Personal XDCs at present can only be create via
mrgCLI and not web GUI.
Creating an XDC via the CLI
First, create an XDC with mrg
mrg new xdc x0.murphy
This creates a new shared XDC x0 associated with the personal project of the user murphy.
A personal XDC can be created with mrg as:
mrg new xdc --type personal x1.murphy
Attaching an XDC to a materialization
Assume the user has a materialization named world.hello.murphy. We now attach the XDC
to this materialization
mrg xdc attach x0.murphy world.hello.murphy
Tip
Remember that shared XDCs are created in the context of a specific project (which could be a user’s personal project). A shared XDC created in the namespace of one project cannot be attached to a materialization in a different project, even if the user is a member of both projects.
Personal XDCs, however, can attach to any project materialization as long as the user is a member.
Detaching an XDC from a materialization
Assume now the user wants to attach x0 to a new materialization named planet.hello.murphy. We
must detach from the first materialization before attaching to the second:
mrg xdc detach x0.murphy
mrg xdc attach x0.murphy planet.hello.murphy
Tip
An XDC can only be attached to one materialization at a timeDifferences between shared and personal XDCs
Shared and personal XDCs differ in several ways. To illustrate this, let’s assume a user
murphy has two projects: a group project proj1 and a personal project murphy.
Naming. Shared XDCs can be created in the context of any project. So, shared XDCs can be named
xdc1.proj1orxdc2.murphy. Personal XDCs can be created only in the context of a personal project. In our examplemurphycan only create personal XDCs in the context of the projectmurphy, e.g.xdc3.murphy.Attaching to Materializations. Shared XDCs can attach only to materializations in the same project they were created for, but only in this project. In our example:
xdc1.proj1can only attach to materializations from experiments inproj1, likemz.exp1.proj1. Personal XDCs can attach to any materialization in any project the user is a member of. So,xdc3.murphycan attach tomz.exp1.proj1. It can also attach tomtz.exp.murphy.User accounts. Shared XDCs come with user accounts for all current members of a project. Any one of those users can ssh to the XDC and reach out to materialization nodes. In scenarios when project members have one materialization they all are exploring, they can and all use the same XDC. For personal XDC there is only one user account - the user who created it. In our example,
xdc1.proj1has accounts and can be accessed by any user who is a member ofproj1;xdc2.murphyhas accounts for all users who are members of the personal projectmurphy(yes, the user can add other members to their personal project). And personalxdc3.murphyhas onlymurphy’s account.Project mounts. Each project is allocated persistent storage that an XDC user can access under
/project/<project_name>. It can be used for collaboration and sharing files. Shared XDCs mount only the storage for the project they’re created for. In our example,xdc1.proj1will have a shared directory/project/proj1/and other XDCs forproj1, if created will also have it. Personal XDCs mount all projects who their creator is a member of. Soxdc3.murphywill have a shared dir/project/proj1/, as well as/proj/murphy/. Note that if a user is added or removed from a project, the shared project mounts in the existing personal XDCs will not be updated. In this case just delete and re-create the XDC.
Reaching an XDC via SSH
SSH via the CLI
The Merge CLI has builtin support for connecting to XDCs via SSH. For example, to SSH to the
x0.murphy XDC created above:
mrg xdc ssh x0.murphy
The SSH command supports a couple of useful options, which can be found via the help command:
mrg xdc ssh -h
The -x flag allows you to SSH directly to an experiment node, in the materialization that your XDC
is attached to. For example, assume that x0.murphy is attached to materialization
world.hello.murphy which has a node called h0. You can reach it directly via:
mrg xdc ssh -x x0.murphy h0
The -L flag is used to tunnel TCP connections through the SSH connection. This is useful if you
are running a webserver or some other service on either an XDC or an experiment node, and you want
to connect to it via your local machine. For example:
# SSH to h0, and forward localhost:4443 to h0:443
mrg xdc ssh -x x0.murphy -L 4443:443 h0

# SSH to x0.murphy, and forward localhost:4443 to h0:443
mrg xdc ssh x0.murphy -L 4443:h0:443

# SSH to x0.murphy, and forward localhost:4443 to x0.murphy:443
mrg xdc ssh x0.murphy -L 4443:443
Attention
Note thatmrg xdc ssh is not a simple wrapper around your machine’s local SSH client. As such, it
does not support the full suite of command line options that most OpenSSH clients support. If you
have an advanced use case and need such options, use your system’s SSH client directly. See the
following section for how to do so.SSH via your machine’s OpenSSH client
You may sometimes prefer to use your machine’s OpenSSH client rather than the builtin CLI support, perhaps because you need advanced options that are not implemented in the CLI.
First, add the SSH jump host to the SSH configuration for your account on your local workstation,
(~/.ssh/config on typical installations) filling in <username> with your MergeTB username and
possibly updating Hostname based on the address of your portal:
Host mergejump

    Hostname jump.sphere-testbed.net
	Port 2022
	User <username>
	IdentityFile ~/.ssh/merge_key
	ServerAliveInterval 30
Tip
The identity file~/.ssh/merge_key is populated automatically after you successfully login
via the CLI (mrg login <username>) on your local workstationNow, use SSH to reach your XDC, using the -J option to specify the name of the jump host and your destination XDC hostname
- From the perspective of the jump host, the XDC hostname will be a combination of the XDC name and the project name:
<xdc>-<project>. - If your local username and your MergeTB username differ, you must explicitly set the xdc username to your MergeTB username. To do this, prepend the username to the xdc name like so:
<username>@<xdc>-<project>. Otherwise, you can get away with just using:<xdc>-<project>.
Putting it all together, you’ll want to invoke SSH in this general pattern:
ssh -i ~/.ssh/merge_key -J <jumphost> [<username>@]<xdc>-<project>
Here is the command in the context of our example, where your local username does match the one you use for MergeTB:
ssh -i ~/.ssh/merge_key -J mergejump x0-murphy
And here is the command in the context of our example, where your local username does not match the one you use for MergeTB:
ssh -i ~/.ssh/merge_key -J mergejump murphy@x0-murphy
Attention
The hostname used to reach your XDC via SSH is dash delimited (e.g., x0-murphy) rather than dot delimited (x0.murphy).
Also, do not attempt to use the FQDN of the XDC as it appears in the web GUI display of XDCs (x0-murphy.sphere-testbed.net in our example).
SSH configuration customizations
You can add an additional stanza to your SSH configuration for your account on your local workstation to capture this recipe for a particular XDC.
Below is an example of a general pattern for such a stanza:
Host <some_prefix_to_avoid_collision_with_other_hostnames>-<xdc>-<project>
        ProxyJump mergejump
        Hostname <xdc>-<project>
        User <username>
        IdentityFile ~/.ssh/merge_key
        ServerAliveInterval 30
In our example, it would look like this:
Host my-favorite-xdc-x0-murphy
        ProxyJump mergejump
        Hostname x0-murphy
        User murphy
        IdentityFile ~/.ssh/merge_key
        ServerAliveInterval 30
Then all you’d have to do to login via SSH would be:
ssh my-favorite-xdc-x0-murphy
This recipe is provided as an example of one way to make connecting via SSH less error prone and more ergonomic for repeated use.
It is by no means the only way to do this. For example, one could make more sophisticated use of wildcards etc in the SSH config markup to setup a single stanza that would apply to any XDCs created for a specific MergeTB project.
Finally, there might be situations where one should not use this particular recipe at all. You will have to gauge this on a case-by-case basis.
Please refer to the SSH docs and any tips/guides online for general SSH best practices and conventions.
SSH configuration for old OpenSSH versions
Older versions of OpenSSH do not support the ProxyJump option. This is the case, for example, for older versions of FreeBSD.
On these systems, we must construct the ProxyCommand option manually in our ~/.ssh/config as follows:
Host <xdc>-<project>
	User <username>
	IdentityFile ~/.ssh/merge_key
	ServerAliveInterval 30
    ProxyCommand ssh jump.sphere-testbed.net -p 2022 -i ~/.ssh/merge_key -W %h:%p
i.e., for user murphy with XDC named x0:
Host x0-murphy
    User murphy
	IdentityFile ~/.ssh/merge_key
	ServerAliveInterval 30
    ProxyCommand ssh jump.sphere-testbed.net -p 2022 -i ~/.ssh/merge_key -W %h:%p
The XDC can then be reached simply via:
ssh <xdc>-<project>
e.g.,
ssh x0-murphy
Note that you can add multiple XDCs to the top-level Host as needed. For example, if murphy created a new XDC x1 in the project ddos, this could be configured as:
Host x0-murphy x1-ddos
    User murphy
	IdentityFile ~/.ssh/merge_key
	ServerAliveInterval 30
    ProxyCommand ssh jump.sphere-testbed.net -p 2022 -i ~/.ssh/merge_key -W %h:%p
It is also possible to simply add the wildcard host *-*, which will match any XDC patterns, but will of course match hostanmes that might not be XDCs, so use at your own discretion.
Reaching an XDC via JupyterHub
XDCs are also accessible via a JupyterHub web interface. Each XDC can be reached via HTTP(s) using a URL shown when you run mrg list xdc or mrg show xdc <NAME>.<PROJECT> if you have a specific XDC in mind:
$ mrg list xdc
Name.Project    Attached    Reference                           Creator    Memory    CPU        Image    URL
------------    --------    ---------                           -------    ------    ---        -----    ---
x0.murphy                   x0-murphy.xdc.sphere-testbed.net      murphy     0GB       0 cores             https://x0-murphy.xdc.sphere-testbed.net/jupyter
and then copy/paste the URL into your web browser.
For XDCs using base image v1.5.1 and earlier, you will need to authenticate to JupyterHub using your regular testbed credentials, the same credentials you use to sign in the launch portal. Starting v1.5.2 you’ll be automatically logged in JupyterHub if you have an active Launch token.
From the JupyterHub home page (control panel), click ‘Start My Server’ button and then ‘Launch Server’ to start a new server. At the next step you can choose a materialization node to run JupyterLab, if an XDC is attached to a materialization, or leave it at ’localhost’ to run JupyterLab in the XDC itself. Click ‘Start’ to start a server.
From the JupyterLab page, click the ‘Terminal’ icon to create a new shell session in the XDC. By default, you will be logged using bash shell running under your home directory. To get a more familiar environment,
New Feature
New JupyterHub interface now allows users to run Jupyter notebooks on attached materializations. After an XDC is attached, the user can go to the XDC URL and start a new server choosing a host name in the pull-down menu.
Also note that Jupyter URLs used to have login tokens embedded in them, but with a switch to JupyterHub they are not needed. Instead, you’re required to sign-in Jupyter with your regular credentals.
Reaching your materialization from an XDC
When an XDC is attached to a materialization a network tunnel is created between the XDC and the materialization network. (As shown above in XDC basics).
The XDC is also configured to resolve names from your experiment into infranet addresses. As discussed in the Node Resolution and Naming documentation, each node in your experiment is known by names on both the experiment network and on the infranet. The experiment network is your network - it is the topology defined by you in your experiment model. The infranet is a command and control network used by the testbed to provision and configure your experiment nodes, and is the only network reachable from an XDC.
To resolve names into infranet addresses from an XDC, simply use their short names – i.e., the names you put in you model:
ssh a
Tip
Note that while short names typically resolve to experiment network addresses when used from within a materialization, they always resolve to infranet addresses when used in an XDC.
See the Node Resolution and Naming documentation for more information on DNS and resolution in Merge experiments.
Copying files to or from your XDC
The Merge CLI has builtin support for connecting copying files to or from your XDC via SSH.
To copy data from your local machine to an XDC, use
mrg xdc scp upload
To copy data from an XDC to your local machine, use
mrg xdc scp download
Note that both commands also support the -x flag to copy data to/from an experiment node directly,
using your XDC as an intermediate transfer node. See the CLI for flag descriptions and example
usage.
As with mrg xdc ssh, the builtin scp command is feature-limited. If you have advanced use cases,
setup your local machine’s OpenSSH config as described in
#ssh-via-your-machines-openssh-client, and then use your
machine’s SCP program directly.
Feedback
Was this page helpful?
Glad to hear it! Please tell us how we can improve.
Sorry to hear that. Please tell us how we can improve.