Hello World (Web Interface)
Attention
Welcome to your guided tour of networked system experimentation in Merge. Start by following the “Getting Started” instructions to create your account and have it approved.
This guide assumes you are using the reference portal at sphere-testbed.net. If you are using a
different portal, substitute addresses in this document that reference sphere-testbed.net accordingly.
Consult your project leader if you are not sure of the portal address.
Now let’s dive in.
Tip
- This guide assumes the username
tinhnguy. Adjust for your username accordingly. - The URLs shown in the screenshots are from a test installation and will not match the URLs in your browser.
- The web interface is known as “Launch” and will be referred to using this name.
Create Experiment Walk-through
This document walks you though the steps to go from nothing to a fully active experiment on the testbed. It then details how to cease the experiment and free all resources used for others. Please take a moment to read the Overview of the Merge Testbed Platform and Experimentation Concepts. Here are the basic steps (don’t worry if you do not understand the terminology, it will be explained).
- Create an experiment in a project.
- Design the experiment network model.
- Push this model to an experiment.
- Realize this model. (Reserve resources.)
- Materialize this realization. (Create the actual nodes and network topologies.)
- Do work.
- Dematerialize the experiment.
- Relinquish the realization. (Free the experiment resources.)
Login to the Portal
Go to the launch page for your portal: https://launch.sphere-testbed.net. Login to the site using the username and password created above. On successful login, you’ll be greeted with a dashboard that will display your Active/Inactive Experiments, and Resource Usage.

To access the list of Projects you have access to, click Projects in the left side menu bar. Initially this will just be your personal project. Your personal project name is the same as your username. It’s created when your account is activated.
Note
To join existing projects, ask the project administrators to add you to their projects. Once added, you’ll have access to everything in these projects and be able to collaborate with other project members.
Tip
Launch displays many elements in a table. These tables (usually) will have the following features.
- A search bar at the top lets you filter the elements. Useful for large tables.
- Up/Down arrows directly after column headings sorts the table by that column.
- Table rows end with an action menu which pops up when the
kabab(the three vertical ) is clicked. These actions act on the element in that row.
- We suggest clicking the kebab each time you see a new table to get a sense of what actions are available.
Create an Experiment
To get started we’ll create an experiment.
Every experiment is a part of a project. Here we are using tinhnguy’s personal project tinhnguy for the home of our hello experiment.
Click the Experiments tab on the left.

Click the New Experiment button. A dialog will spawn in which you can fill out the details of the new experiment. Details of the fields are:
Project- this is a drop down list of projects you have access to. At the moment you only have access to your personal project. As you join other projects, they will be added here.Creator- your account. This cannot be changed.Name- the name of the experiment. We are usinghellohere.Description- an optional field to describe the experiment.

After clicking Submit, the experiment is created. You will see your new experiment listed.

Experiment Details
Now that the experiment exists, we can view the details by clicking the name of the experiment, hello, in the Experiments tab. This will take us to a page the experiment’s details page.

In addition to the information we’ve already seen, this display shows us two new things.
- The address for a Merge-hosted Git repository for our experiment https://git.sphere-testbed.net/tinhnguy/hello
- The revisions of the experiment models associated with this experiment and any live realizations based on the model revisions.
The Git repository is created just for your experiment. It’s a normal git repository so you can store experiment related data there. The Portal also uses it to store the model and all model revisions for your experiment. So let’s create a new model and push it to our new hello experiment.
Compiling and Pushing an Experiment Model
The experiment model expressed as a python file. We create the file then push it to the experiment Git repository. You can push it using standard git tools if you’d like, but Launch can do this for you.
An Aside
The experiment models are stored in the experiment Git repository and must have a specific name and path. The file must be namedmodel.py and be in the root directory of the repository. Launch hides these details but they are good to know. After we create our first model we suggest that you git clone the experiment repository and examine its contents. Assuming this experiment, the command would be git clone https://git.sphere-testbed.net/tinhnguy/hello.Launch has a built-in model editor. Click the Model Editor tab to get to it.

If you have an existing model, you could Browse to it or drop it in the editor. We’re starting from scratch though, so click Start from scratch to load an empty file. Cut and paste the following into the editor.
from mergexp import *

# Create a network topology object. This network will automatically
# add IP addresses to all node interfaces and configure static routes
# between all experiment nodes.
net = Network('hello-world', addressing==ipv4, routing==static)

# Create three nodes.
a,b,c = [net.node(name) for name in ['a', 'b', 'c']]

# Create a link connecting the three nodes.
link = net.connect([a,b,c])

# Make this file a runnable experiment based on our three node topology.
experiment(net)

Note that on the upper left of the editor frame, we now have more options. In addition to standard file operations like Clear, Upload, Download, etc, there are two model specific buttons.

compile- this button sends the current file in the editor to the Portal for compilation. If there is an error in the model, the GUI will display the error. If the compilation is successful the GUI displays the model topology under the editor.
push- this button pushes the current file in the editor to the experiment repository. The portal will see that a new model has been pushed, and compile the model in the background. The compiled model is then added as aRevisionto the experiment.
Warning
Compilations do not complete successfully unless the model file ends with the experiment statement. Compiling a model without that statement will result in an error.Warning
Once a model is pushed to the experiment it is committed to the experiment repository. This is true even if the model has an error and does not compile. So it is a good idea to always compile the model and confirm it compiles correctly and the model topology is what you expect before you push the model. before ! If a bad model is pushed, it is not the end of the world. You will just have a revision of the model that it not useful as it cannot be realized.Here’s an example compilation failure. (I changed the N in Network to an M, making the symbol invalid.)

And here’s a successful compilation. Note the success message. Also note the compiled topology below.


Once you confirm that the model compiles, push the model to your experiment by pushing the button.

This dialog currently has no editable entries. It is purely informative. It shows the experiment the model is being pushed to along with the branch and tag the model is under in the repository. Now push the model by clicking Push.
Above the editor you will see a confirmation message that the model was successfully pushed. (Or an error if it was not).

You can click on the experiment name to be taken to the experiment details page or the commit hash of the revision to be taken to the revision details page. Click the experiment name hello.tinhnguy.
We see that our model revision has been added to the experiment at the bottom of the page. The revision compiled successfully, but has not been realized. This is the next step to create a working experiment.

Realizing the Experiment
Realization is the act of finding a suitable set of resources for your experiment, and allocating those resources for your experiment’s exclusive use. The specific resources are reserved just for your experiment. The realization is a reservation on all the hardware needed to run the actual experiment. To free the resources for use by others, you need to relinquish the realization. But now we will realize the single experiment revision in our experiment.
Go to the Experiments tab and click on the name of the single experiment, hello. Click on the Revision hash we want to realize. There is only one as we’ve only pushed a single revision. In the images this is c22baabe. For you it will be something else. This takes you to the revision details page.

Click on the revision tabs to see the model in different formats. (Source code, experiment Representation (XIR), Graphviz topology, etc). Click on the topology tools to get a sense of what’s available in the topology display. When you’re ready to realize the model, click the Realize Revision button.


Give the realization a name, realizationtest. You can leave the start date, time, and duration as default for now. And click Submit. This will start the realization process. If the process started successfully, a “realization successful” pop up will be displayed.
Assessing Realization Status
Realization, like most everything on a merge portal, is an asynchronous process. (Realization for this model should take less than a second.) To check the status of your realization, click the Realizations tab. From here you will see two pages, Realizations List and Calendar View. In the list view, if the realization is complete you are greeted with a single successful realization.

If the realization failed, the Succeeded entry in the table would be a Failed button. Clicking the button will show you why the realization failed. A failed realization is usually due to the testbed not currently having the resources requested available at the time of realization. (You can click Resources on the left-side menu to see the total and available resources on the testbeds attached to the portal.)
You can see the realization details by clicking on the first entry in the row, the name, realizationtest.

The realization details are
Name- the hostname of the node as given the modelExperiment Address- the address on the experiment network (if given in the model)Intranet Address- the address on the command and control network used by MergeKind- the kind of node. Physical or virtualResource- the name of the machine in the facility being usedImage- the OS the node is runningFacility- which facility the node exists in
Advanced Realizations
The Realizations tab also offers the Calendar View as mentioned above. This calendar is created to help users create realizations in a more efficient and organized manner.

Clicking on the calendar tab will give you a calendar that tells you what days are the busiest days (lots of reservations that day), or what days are the most free (lower amount of reservations that day). This is communicated to the user through a heatmap where darker shades of blue represent busier days, while lighter shades of blue represent freer days. The number on the days in the calendar represent the exact amount of reservations there are that day.

On the top of the calendar, there is a dropdown which lets you change the calendar from a monthly view, to a weekly view. Click on the dropdown and choose the Week option. This view will now display the days of the week that are most busy and least busy, however, it will also show the user the specific times that have the most/least reservations. Users can use this view to schedule reservations for increased efficiency and precision. By clicking on certain time slots, you will also be able to schedule your realization for that time. Now click on a time slot, or the Make Reservation button to create your reservation.

A dialog box will pop up just like in the Revisions page. This dialog box will contain the same input fields as the dialog box in the Revisions page including uneditable fields like Project, Experiment, Revision, and editable fields like Realization Name, Start Date, Start Time, and Duration. Notice that the default duration is 1 week, and the maximum duration is 1 month. Additionaly, if you clicked on a time slot to open this dialog box, the start time should be filled in accordingly. Close this dialog box as you already have a Realization made from earlier.
Note
There is a current limitation (as identified in the dialog box) where realization scheduling is yet to be implemented. The backend doesn’t currently support future dates, so for now the realization will just start immediately no matter when you schedule it.
By clicking on a day in the month view or a day in the week view, you can access the Day View as shown above. From here you can see a list of reservations with the same details that you would get from the Realizations List tab. Click on the Back to Week View button, and then go back to the Month view.

There is a toggle on the top of the calendar for Resource Usage. Click on the toggle button. You will notice that the numbers in the calendar days have increased considerably. Those numbers now represent the resources (# of nodes) that are reserved that day. Different reservations have different number of nodes reserved, so this feature gives users more accurate data on reservations for each day.
Materializing the Realization
Materialization is the process of taking the resources reserved by your realization and making them exist in the world. Nodes (bare metal nodes and/or virtual machines) in the experiment are turned on, imaged with the correct operating system and configured according to experiment specifications. The network to implement the experiment topology is created (along with an command and control “infrastructure” network that the portal uses for node management).
To materialize your realization, go to the Realizations List tab, click the kabab menu of your realization, and choose Materialize. This will kick off the materialization process. A pop-up will let you know the process has started. (The Relinquish command will delete the realization and free its resources for use to others.)

To see the materialization details (and status) click the Materializations tab.
The materialization information is very similar to the realization information. Note though that this table has a kebab action menu, indicating that actions may be taken on individual nodes in the materialization. Actions that you can make include Dematerialize which tears down the experiment, Warm Reboot (soft reboot), Power Cycle (hard reboot), and Reimage which wipes the current OS and installs a new system image on the node. The Status field shows the current status of your materialization. Until the experiment nodes and networks are fully configured, this will be Processing.

Once fully materialized, the status changes to Success.

You can see all materialization tasks (how the experiment nodes and networks were configured) and the materialization details by clicking the name of the materialization, which in this case is realizationtest.hello.tinhnguy. The Status tab shows status (of course) and the Details tab shows the details.
 .
.
Interacting with the Experiment
Create an XDC
The entry point to your experiment is an eXperiment Development Container (XDC). This container runs inside the Portal and serves as a home base for experiment development, configuration, and analysis. The container exists in a project space and can “attach” to any materialization in the same project that it is in. The attach process creates a tunnel from the XDC to the “infrapod” inside your experiment. From there, you can connect and interact with nodes in your experiment. Note that all XDCs have remote permanent storage in your home directory and a project-specific /project/
Click the XDCs tab on the left then the New XDC button. Fill out the dialog specifying the name of the XDC and the project under which it resides. (The projects drop down menu is populated with projects you have access to. At the moment, that is the single tinhnguy project.) Click Submit to create the XDC. The XDCs table will reload and show the new XDC xdc.tinhnguy.

Note
The XDC will take a few moments to spin up. While it is spinning up the fieldSSH Name will be shown as N/A. Once the XDC is active the field will show the ssh hostname of the XDC. The XDC listing will not automatically refresh to show this. You’ll need to refresh the page yourself.
The XDC details are as follows:
name- the short name of the XDC. The long name, which you’ll see references to elsewhere is<xdc name>.<project name>. In our case this isxdc.tinhnguyProject- which project of the XDCType- personal or shared XDCAttached- the materialization to which the XDC is attached, if anyURL- This is a link to the JupyterHub instance running on the XDC.SSH Name- the ssh hostname of the node. This is the name used to ssh to the XDC.Creator- who created the XDC. In this case, it’s you.Memory Limit- the maximum amount of memory in GB the XDC can useCPU Limit- maximum limit of CPU time given to the XDCImage- the container image
Login to the XDC
Now that the XDC is running, you can log into it. When an XDC is created user accounts are added to it for all members of the project in which the XDC exists. The merge generated users ssh keys are placed in these account. There are two ways to login to an XDC: 1) open a console in the XDC’s jupyter instance or 2) login via ssh. Logging in via ssh is covered here in the XDC documentation) so we’ll cover the first way.
Click the XDCs tab, then click the Jupyter link. This will spawn a new window to the JupyterHub instance
running on that XDC. In older versions of XDCs you’d be prompted for your login name and password. In newer versions,
you’ll not need to enter your credentials unless your current launch token has expired. In that case you may need to
round-trip through main Launch login page.

Enter your Launch credentials, if prompted, and click Sign in button.
The JupyterHub control panel shown below allows users to start “named” servers. We recommend leaving named servers for
running JupyterLab on materializations nodes. To run a default server, click Start My Server button.

When starting both the default or a named server, you have an option to choose
what host you want to run your server on. The default is localhost which corresponds to running JupyterLab server on the XDC
itself. This is the only option available when an XDC is detached. After an XDC is attached, you can reload this page and you
may have more options. For now, let’s just click on Start button as shown in this picture:

This launches a JupyterLab server running as the logged-in user (tinhnguy in our example) in the user’s home directory.

Click the Terminal button. This will open a terminal on the XDC. The merge command line utility, mrg is installed on all XDCs. (It is also preconfigured to communicate with the portal.) You use this to build a secure tunnel between the XDC and your experiment. This is covered in the next section.

Attaching to the Experiment
Attaching to an experiment is the process of creating a secure tunnel between an XDC and a materialization’s network. Once attached, an XDC can connect directly to any node in the materialization. To attach the XDC to a materialization, click the XDCs tab. Choose the row of XDC to attach. In our case there is only one, the xdc.tinhnguy XDC. Click the action menu and choose Attach.

This spawns a dialog. The XDC name is the one you chose. Now choose the materialization to attach to. The Materialization drop-down menu is populated with all the materializations you have access to in that project. There is only one at the moment, realizationtest.hello.tinhnguy so that is chosen for you automatically. Click Attach.
The attach process takes a few moments. The XDC list will refresh, but before the attach process completes. So wait a moment then refresh the XDCs page. After this you can see the Attached column shows that your XDC xdc.tinhnguy is attached to the realizationtest.hello.tinhnguy materialization.

Configuring and using the Experiment Materializations
Please see the documentation on Experiment Automation.
Rebooting or Reimaging Nodes of a Materialization
After an experiment has materialized, you can reboot or reimage nodes at any time. Nodes can be warm rebooted, in which the node OS attempts to gracefully shutdown and restart, or hard reset through a power cycle operation. Nodes can also be reimaged, which corresponds to a power cycle operation plus resetting the node to its base image specified in your experiment model.
Navigate to the materialization page for your materialization, click to the ‘Details’ page, and then click the kabob button on the right to reboot or reimage an individual node.

It is also possible to reboot or reimage every node in your materialization. Click on the global ‘Materializations’ tab, find your materialization, and click on the kabob button on the right.

Experiment Cleanup
Once you’re done using the your experiment, you should free the resources for others. Merge is smart about experiment clean up and will free and relinquish all resources when an experiment is deleted. We go through the steps here though for informational purposes and in case you ever need to partially cleanup an experiment. Knowing these steps are useful.
Detach XDCs
To detach an XDC, navigate to the XDCs tab. Find the XDC to detach (in our case there is only one). Choose Detach from the action menu.

Note that the Attached column is now empty. (If it is not, refresh the page.)
Dematerialize the Experiment
Dematerializing an experiment does the opposite of materialization. The nodes are reimaged and the experiment networks are torn down. Note that this does not free the resources for use to others. The realization is resource reservation. We’ll relinquish the resources in the next step.
Click the Materializations tab on the left. Find the row that corresponds to the materialization you want to dematerialize. In our case there is only one, realizationtest.hello.tinhnguy. Click the kabab menu at the end of the row and choose Dematerialize.

Relinquish the Resources
Now we’ll free the resources you’ve reserved with your realization.
Click the Realizations tab. Find the realization you want to relinquish. In our case there is only one. Click the kabab menu on the far right of the row and choose Relinquish. The table will refresh and that entry is gone. The realization is relinquished.

(If you want to re-realize, just browse to the hello.tinhnguy experiment page, choose the model revision, and click the Realize Revision button.)
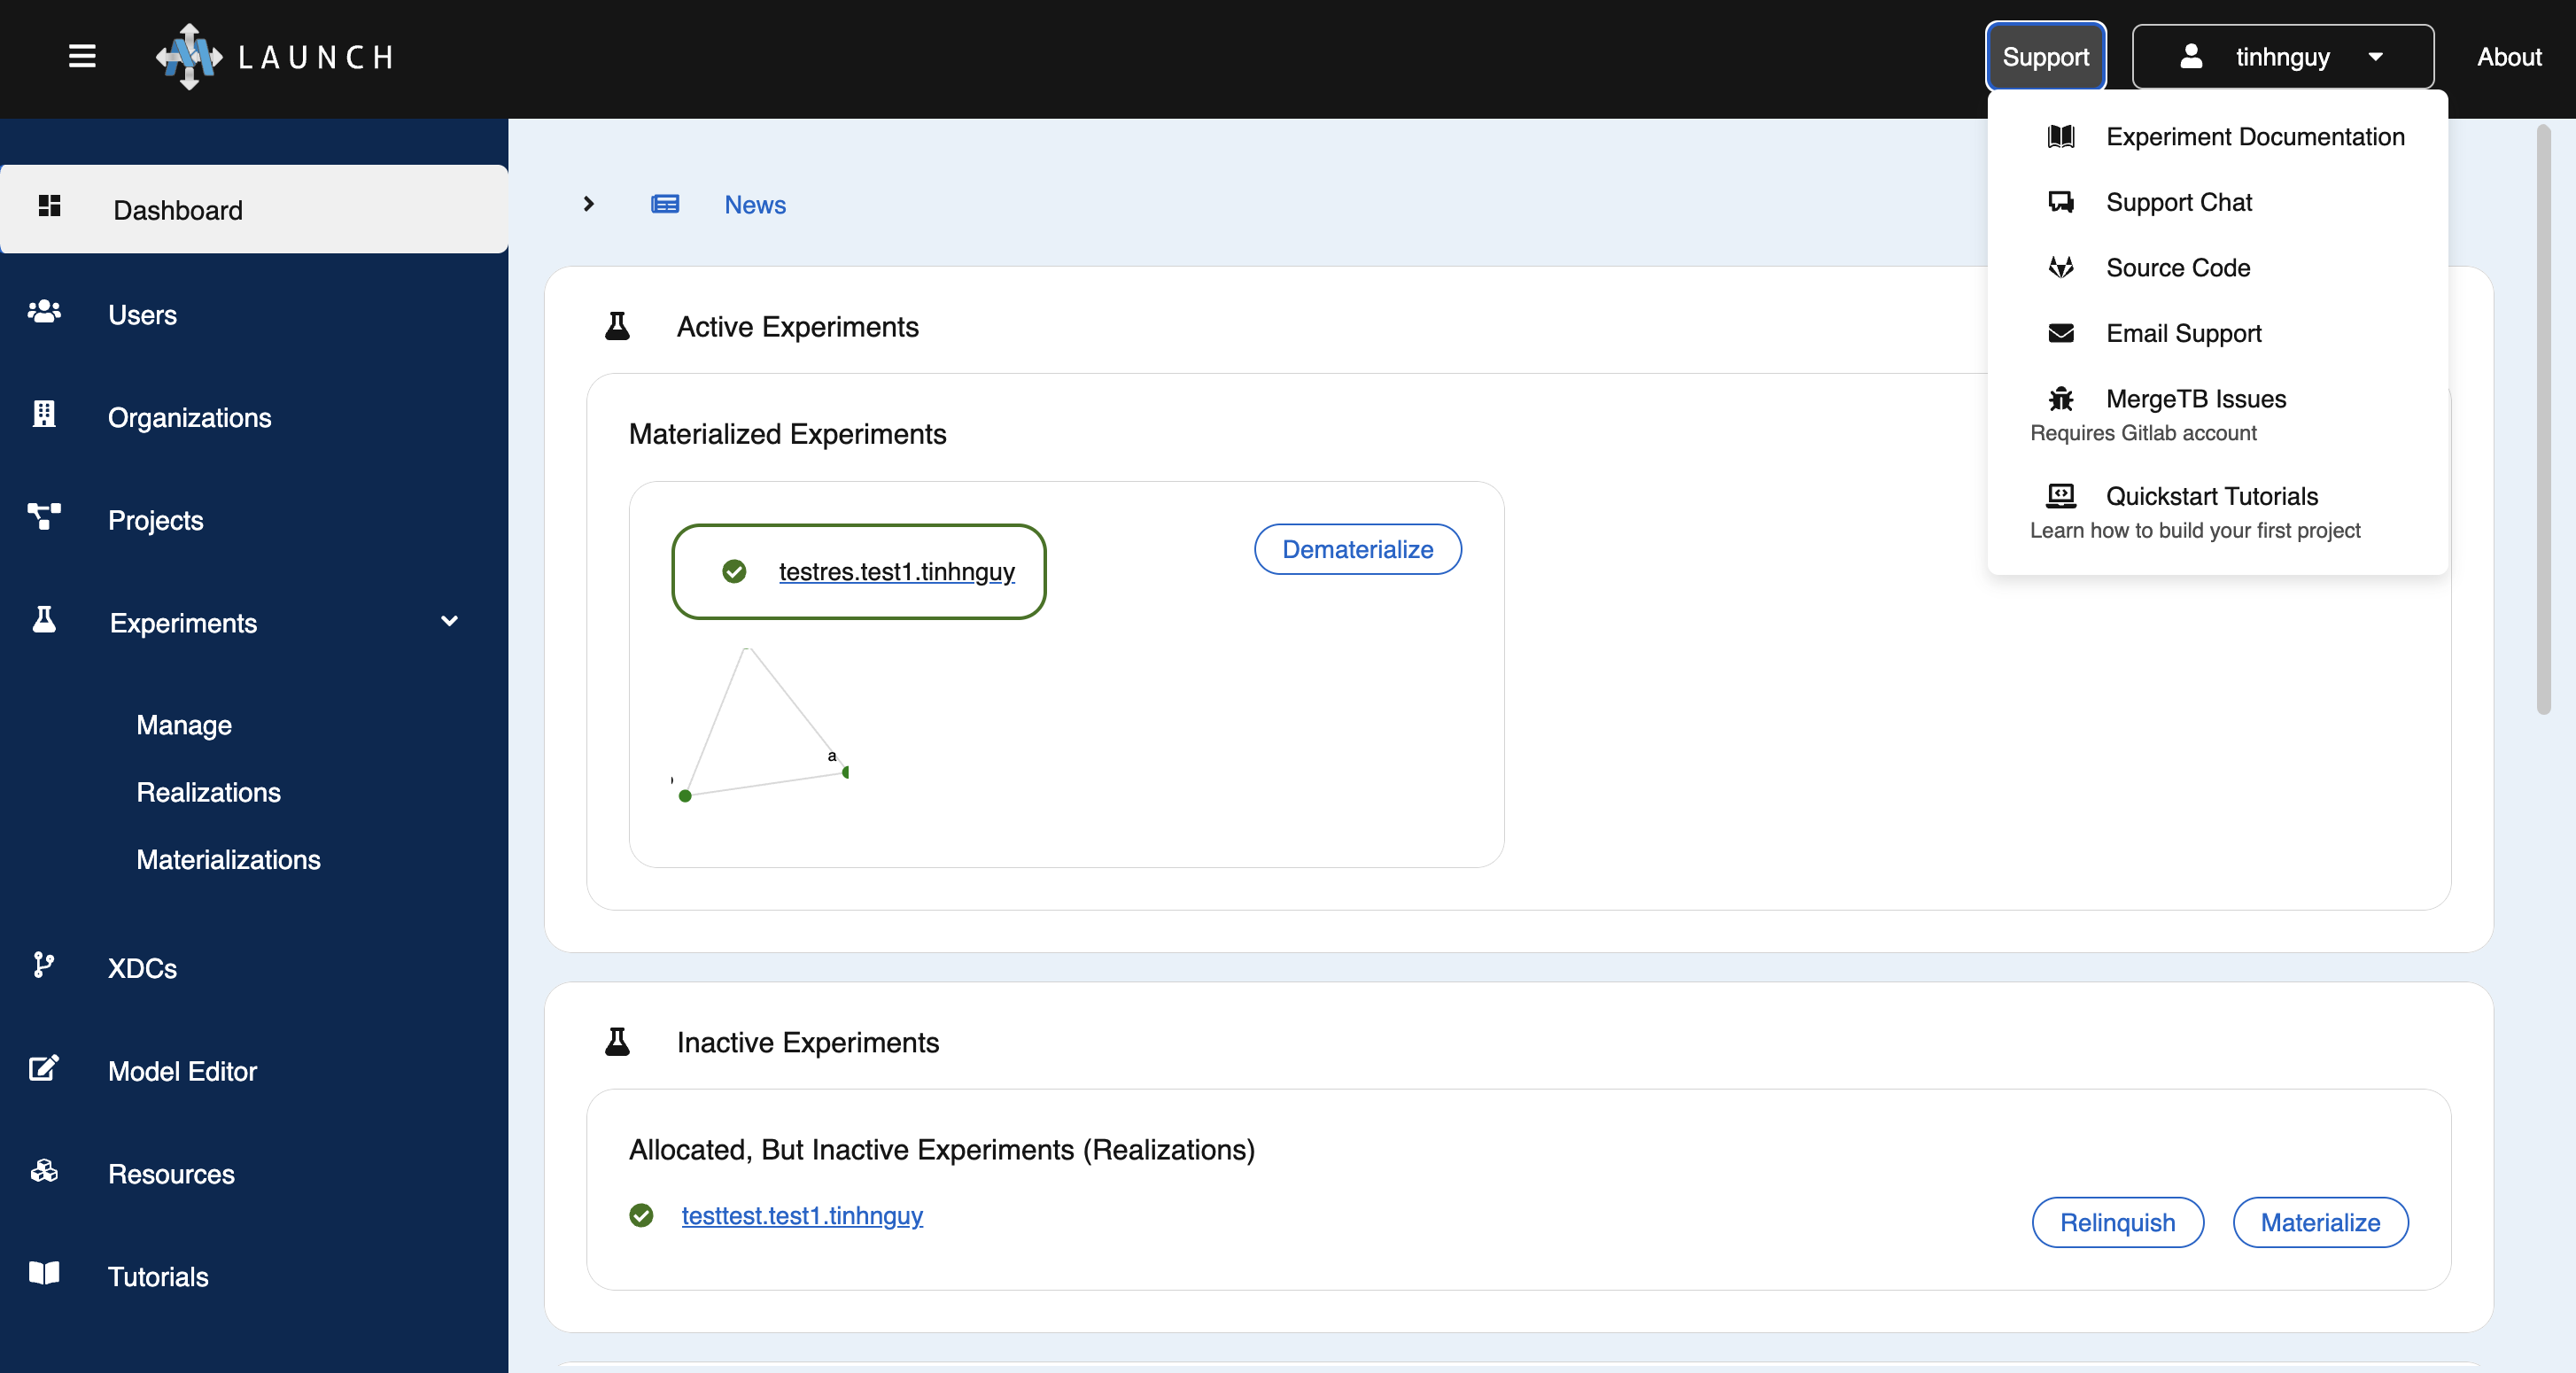
Support
The Support dropdown menu in Launch has links to a few ways to get support. For immediate help the best way to contact us is via Support Chat. Bug reports or feature requests can be given to the Merge Testbed Gitlab repository issues system. You can also view the Source Code as well by clicking the corresponding items in the dropdown.
Feedback
Was this page helpful?
Glad to hear it! Please tell us how we can improve.
Sorry to hear that. Please tell us how we can improve.